
This is a strategy page for Last Stand, a Brain Buster in Plants vs. Zombies 2. The strategies here are additional ones that are not in the level pages themselves.
Before adding your own, please overview the Rules Page first.
Ancient Egypt[]
Level I (Day 18)[]
Infi-Snap Strategy[]
Plants needed:
- Infi-nut (IN)
- Snapdragon (SN)
- Anything else to fill the seed slots
Plant one column of Snapdragons, one Infi-nut at the third row, one column with Snapdragons, and finish with another Infi-nut. Then, use Plant Food on Infi-nuts.
You can plant one or two more Snapdragons behind the second Infi-nut's force wall.
SN - SN SN
SN - SN
SN IN SN IN
SN - SN
SN - SN SN
Bloom-Choynut Strategy[]
Plants needed:
- Bloomerang
- Bonk Choy
- Wall-nut
- Anything else to fill the seed slots
Plant 1 column of Bloomerangs at the back, one column of Bonk Choys next, and one column of Wall-nuts.
(Note: There will be 125 sun left, so spend it on Wall-nuts because 2 Wall-nuts will probably get eaten.)
B BC W - - - - - -
B BC W - - - - - -
B BC W - - - - - -
B BC W - - - - - -
B BC W - - - - - -
B: Bloomerang
BC: Bonk Choy
Bloompeater[]
Plants needed:
Plant a column of Repeaters and a column of Bloomerangs.
R B - - - - - - -
R B - - - - - - -
R B - - - - - - -
R B - - - - - - -
R B - - - - - - -
R - Repeater
B - Bloomerang
Bloomerang-nut[]
Plants:
Plant two columns of Bloomerangs and one column of Wall-nuts.
B B W - - - - - -
B B W - - - - - -
B B W - - - - - -
B B W - - - - - -
B B W - - - - - -
B - Bloomerang
W - Wall-nut
Seven Plant Army[]
Plants:
R - - - - - - - -
W R - - - - - - -
R - - - - - - - -
W R - - - - - - -
R - - - - - - - -
R - Repeater
W - Winter Melon
Laser Strategy[]
Pick Laser Bean and fill in the first two columns with it. Use PF on emergencies.
Laser Dragons[]
- Place a column of Laser Beans on the first column closest to the house.
- Place a column of Snapdragons on the second column closest to the house.
- Place a column of Wall-nuts on the third column closest to your house. (You have to wait until the plants destroy the graves in order to fill in the two rest tiles.
Level II (pre-1.7)[]
Dragon weed strategy[]
Plants needed:
- Snapdragon
- Spikeweed
- Anything else as fillers
Put your plants in this manner:
| B | B | B | SN | SW | SW | B | B | B |
| B | B | B | SN | SW | SW | B | B | B |
| B | B | B | SN | SW | SW | B | B | B |
| B | B | B | SN | SW | SW | B | B | B |
| B | B | b | SN | SW | SW | B | B | B |
- SN is Snapdragon
- SW is Spikeweed
- B is blank
Don't worry about Explorers, Coneheads and Ambush Zombies. They will die by the Spikeweed-Snapdragon attack before they can even reach your Snapdragons.
Note: They might be some tombstones at locations where you are supposed to plant your Spikeweeds but they can be destroyed by Snapdragon's Plant Food effect.
Bloomerangs/Cabbage-pult Strategy[]
Plants needed:
- Bloomerang
- Cabbage-pult
- Wall-nut
- Anything else to fill the seed slots
Plant 1 column of Cabbage-pults at the back, one column of Bloomerangs next, and one column of Wall-nuts.
Use Plant Food on the Cabbage-pults when things get hairy to utilize the cabbage bomb. You will only get three at the start.
(Note: There will be 125 sun left, so spend it on Potato Mines to get rid of the tornado zombies in the first wave.)
Bloomerang Strategy[]
Plant needed:
Plant two columns of Bloomerangs.
B B - - - - - - -
B B - - - - - - -
B B - - - - - - -
B B - - - - - - -
B B - - - - - - -
B - Bloomerang
Hate Them, Spring Them Strategy[]
This strategy makes Spring Bean now useful prior to the 1.7 update. And all the following plants you need is:
- Bloomerang -Br
- Snapdragon -Sd
- Spring Bean-SB
- Any plants after that but don't use them.
After selecting plants, follow the setup below:
- Empty Space - __ or -
Br Sd SB - - - - - -
Br Sd SB - - - - - -
Br __ SB - - - - - -
Br Sd SB - - - - - -
Br Sd SB - - - - - -
Notes:
- Spring Beans are used to stall down any extra Conehead Mummies and Explorer Zombies.
- Snapdragons are placed like that due to its 3x3 fire range in order to equalize the damage they take between lanes.
- When in an emergency, use Plant Food on Snapdragons.
This strategy is created by AWikiBoy521.
Let Them Have Their Fun![]
This strategy uses only 2 plants to kill the zombies, and does not require usage of Plant Food. The name is a reference to how the strategy will never try to destroy Graves.
Each row has a Wall-nut and three Spikeweeds ahead of it. The total for every row is exactly 1750, and leaves no room for Wall-nut First Aid. Upon the event a Wall-nut is at its last degrade before the last wave, place a Plant Food on it. It shouldn't happen, but could.
NOTE: It may seem like that the Explorer Zombies may survive the Spikeweeds and incinerate the Wall-nut, but they will never reach it, dying after two Spikeweeds, or slightly more.
Level III (Day 24)[]
Bowl 'em all! Strategy[]
You need:
- Bowling Bulb
- Wall-nut
- Iceberg Lettuce
- Imitater Iceberg Lettuce (optional)
First, plant two columns of Bowling Bulb at the very left side, plant a column of Wall-nut next to the Bowling Bulbs, then finally fill the rest of the lawn with Iceberg Lettuce. Hit "Let's Rock" now!
- There's a chance that the 3rd column has been filled with tombstones. You have to wait until the Bowling Bulbs destroy the tombstones before you can place your Wall-nuts.
Tips:
- Continuously replace Iceberg Lettuce if some are activated.
- Use Plant Food on Bowling Bulbs wisely.
Melony-nut strategy[]
First, you take these:
First, plant a row of Melon-pult at the back and then put a row of Tall-nut after the Melon-pult
Tips
- Use the Plant Food if there is an emergency.
Winter-Pulettuce[]
Use these Plants:
- Winter Melon-W
- Melon-pult-M
- Iceberg Lettuce-IL
- - Blank space
Here's the setup:
M IL IL - - - - -
W IL IL - - - - -
W IL IL - - - - -
W IL IL - - - - -
M IL IL - - - - -
Tip:Use Power ups or Plant Food wisely.
Bloom-nuts[]
This strategy only uses plants from the first world, no plants from other worlds needed.
- B ~ Bloomerang
- W ~ Wall-nut
B B W W - - - - -
B B W W - - - - -
B B W W - - - - -
B B W W - - - - -
B B W W - - - - -
Optionally, the rest of the field can be filled with Iceberg Lettuce; the strategy should work even without them, though. Plant Food is sometimes needed in the final wave, used on a bloomerang if both the Wall-nut in front of it are gone.
Repeanut[]
Plants needed:
- Repeater
- Wall-nut
- Iceberg Lettuce (optional)
Plant two columns of Repeaters and one column of Wall-nuts. Other spaces can be filled with Iceberg Lettuce. Use Plant Food on Iceberg Lettuce when needed.
R R W - - - - - -
R R W - - - - - -
R R W - - - - - -
R R W - - - - - -
R R W - - - - - -
R - Repeater
W - Wall-nut
Plant Party Strategy[]
Plants required:
Setup:
RB
WB
RN
WB
RB
R=Repeater
W=Winter Melon
B=Bonk Choy
N= Wall-nut
Fill other spaces with Iceberg Lettuce. There are some graves that plants will take care of after pressing "Let's Rock!". Use Plant Food on Winter Melon if needed.
Have fun!
(This strategy was made by CoffeeCupProductions)
A "bad cold" Strategy (Other version of Plant Party strategy)[]
Plants needed:
Setup:
_BG
WB_
_BT
WB_
_BG
B=Bonk Choy T=Tall-nut W=Winter Melon _=Iceberg Lettuce G=Grave (Important! Replace the Grave with Tall-nuts once they are destroyed.)
Replace other spaces with Iceberg Lettuce. Use Plant Food on Winter Melon if Pharaoh Zombies go too close.
Have fun!
(This strategy was made by CoffeeCupProductions)
Cabloom[]
Required Plants: Bloomerang (Bg), Iceberg Lettuce(IL), Cabbage-pult/Kernel-pult(CP), Wallnut(W), Potato Mine(PM)
Set up your defenses like this:
Bg cp pm w
bg cp pm w
bg cp pm w
bg cp pm w
bg cp pm w
- Note: The Iceberg Lettuce is a backup emergency plant.
Gatling Peas
By Amokcrafter7364
Required Plants: Peashooter or Repeater.
- Plant 2 columns of Repeaters or 4 columns of Peashooters.
- You may spend the extra sun on these plants:
Torchwood: Plant it in front of your peashooting plants to boost their damage.
Defensive plants: Any Reinforce-mint family plant. Infi-nut + Plant Food is preferred as it can stop Explorer Zombies and save sun for other plants.
Single-use plants: To take out priority targets or swarms quickly.
Pirate Seas[]
Level I (Day 14)[]
Kernelang Strategy[]
Plants Needed:
First plant Kernel-pult down the first column. Then put Bloomerangs down the second column and Wall-nuts down the 4th column. If there is sun left you can put Kernel-pults down the third column.
Pure Corn Strategy[]
Plant Needed:
Plant two columns of Kernel-pults in the back two columns. Use Plant Food when in danger.
Repeater and again Strategy[]
Plant repeaters in the first 2 columns. Use Plant Food in danger.
Cabbage Corn Dragon[]
Plants needed:
C K W - - x x x x
C K S S - - - - -
C K S S - - - - -
C K S S - - - - -
C K W - - x x x x
C - Cabbage-pult
K - Kernel-pult
S - Snapdragon
W - Wall-nut/Spring Bean
- = blank space
x - water
Fried Butter[]
Plants needed:
- Kernel-pult
- Lightning Reed
- Peashooter, or preferably Snow Pea
Plant a layer of each kind of plant. Then sit back and watch the sparks fly. The butter patties will delay almost everything that comes your way; with Snow Peas in addition, there is basically no chance that any zombie will get close enough to your plants to do damage. The sole exception are Zombie Parrots, but they can be dealt with by using Plant Food on a Kernel-Pult. This build is particularly good for grinding, because it requires almost no attention from you as a player, and can also be deployed on Last Stand Lv.II.
Lightning Melon strategy[]
Plants Needed:
- Winter Melon
- Lightning Reed
W- Winter Melon
Field:
L L - - - - - - -
W L - - - - - - -
L L - - - - - - -
W L - - - - - - -
L L - - - - - - -
NOTE: Use Plant Food In Final Wave or when in danger
Lightning Dragon
Plants needed:
L L S - - x x x x
L L S - - - - - -
L L S - - - - - -
L L S - - - - - -
L L S - - x x x x
L - Lightning Reed
S - Snapdragon
MOAR MOAR Lightning Strategy[]
Take the following plants:
Setup:
LLL - - - W
LLL - - - -....
LLL - - - -....
LLL - - - -....
LLL - - - W
L=Lightning Reed
W=Plant Food Wall-nut
-=Land
.=Water
Strategy:
Use Plant Food on a Lightning Reed during the final wave. Use your spare sun by planting a Potato Mine.
(This strategy was made by CoffeeCupProductions)
Burn Strategy[]
Plant 2 columns of Snapdragons and 3 more Snapdragons in the middle. Use Plant Food for emergencies only.
Block and Fire Strategy[]
Plants needed:
Setup:
L B W / / - - - -
L S W / / / / / /
L S W / / / / / /
L S W / / / / / /
L B W / / - - - -
or alternately,
L B W / / - - - -
L / / S W / / / /
L B W / / / / / /
L / / S W / / / /
L B W / / - - - -
Other variants may also work.
L = Laser Bean
S = Snapdragon
B = Bonk Choy
W = Wall-nut
/ = Empty land
- = Water
Use Plant Food sparingly.
Power of A.K.E.E.[]
Note: This strategy requires the use of plants from both the Far Future and Lost City. If these plants have not yet been unlocked, use a different strategy.
Plants needed:
This strategy relies on Blover instead of Kernel-pult to deal with the Pirate Captain Zombies. To begin, fill the first two columns with A.K.E.E.s. Plant an Infi-nut in the third column and put Plant Food on it. Start the wave. The A.K.E.E.s seeds will bounce right over the barrels of the Barrel Roller Zombies, rendering them harmless. The only threat left is Pirate Captains. When they send out their parrots, use a Blover to blow them off the screen. To finish the level off right, use Plant Food on an A.K.E.E. at the final wave.
Laser Punching[]
Plants needed:
Place 5 Laser Beans on the first column; place 5 Bonk Choys on the second column and place 5 Wall-nuts on the third column. When the Zombie Parrots about to pick up a plant, use Plant Food on Bonk Choy to deal with them.
Level II (pre-1.7)[]
Bonk pult Strategy[]
Plants needed:
If there is any sun left, use the Spring Bean.
First, plant the Kernel-pult or Cabbage-pult down the first and second columns. Put Bonk Choys down the third column, but only in the lanes without any planks. Plant the Wall-nuts down the fourth column.
Cabbage Corn Dragon[]
Plants needed:
C K S S - - - - -
C K S S - - - - -
C K S S - - - - -
C K S W - x x x x
C K S - - x x x x
C - Cabbage-pult
K - Kernel-pult
S - Snapdragon
W - Wall-nut/Spring Bean
- = blank space
x - water
Butter, better hot Strategy[]
For this strategy, you will need:
Setup:
KKKWs_,_,_
KKSW--------
KKSW--------
KKKWs_,_,_
Tips: Use Plant Food on your Snapdragons if too many zombies come. Don't worry if your Spring Beans are eaten by the zombies.
(This strategy was made by CoffeeCupProductions)
Level III (Day 22)[]
Close Ranger[]
- Created by RandomDolphin
Required Plants: Spikerock, Wall-Nut, Snapdragon. How to:
Back row: Plant 2 Snapdragons on second and fourth lanes.
Second to back row: Fill with Snapdragons.
Third from back row: Fill with Wall-Nuts
Second to front row: Fill with Spikerock.
No premium plants required! Now wreak havoc on those pests!
Spikes in Flatulence[]
- Created by TheZombiemelon
- On the back most row, plant Spikerocks.
- Cover all other spaces with Chili Beans.
- Let us rock with zombies and their disturbing bouts of gastrointestinal stress.
[]
- Created by Murabito
- Ingredients:
- Additional ingredients that make the cake "more delicious" though very unnecessary
- First, plant a row of Strawbursts at the back. Then plant one column of the Snapdragon of your choice right after. Use the Strawburst to destroy Imp Cannons. Timing is crucial because the Strawburst may target a dead zombie body instead. If you mess up, and Imp Cannons start to self-destruct, the Snapdragons will help taking the Imps out.
- Enjoy your Strawburst Shortcake topped with fried/chilled Imp heads!
Speedy Lasers[]
- Created by Drkdragonz66
- Fill the back two columns with Laser Beans and the third with Wall-nuts.
- Takes about 1 minute and 30 seconds to finish the level from level select to end, depending on how fast you are in placing down the plants and using Plant Food.
OR
- Fill the back two columns, and the first, third, and fifth row in the third column with Laser Beans. Upon reaching final wave, use the two Plant Foods on the Laser Beans in the second and fourth row.
- Takes under 1 minute and 15 seconds to finish the level from level select to end depending on how fast you are.
Fist and Punches[]
- Plant Snapdragons at the first column and Bonk Choys at the second column.
- As all zombies are weak at this level, They get killed easily.
- Imp showers will get killed by Snapdragons.
Bloom and Doom[]
- Plant two rows of Bloomerangs on the left side of the screen.
- Plant a row of Snapdragons in front of them. You're ready to rock! The Bloomerangs will go through the invading zombies, simultaneously damaging the Imp Cannons.
Dragon Age[]
- Plant three rows of Snapdragons on the left side of the lawn.
- They may not reach the Imp Cannons but they can easily take down all the Imps it will blast in seconds.
Bowled Across the Water[]
Plant two rows of Bowling Bulbs, plus as many as you have enough sun for in the third row. The Bowling Bulbs will roll across the water, and do severe damage to the Imp Cannons, usually decapitating incoming Swashbucklers. When an Imp starts to eat a Bowling Bulb, use Plant Food if necessary.
Fume-shroom/Tall-nut/Boosted Infi-nut Strategy[]
- Created by Snuffygetlucky
- Required plants:
- Plant three rows of Fume-shrooms in the back, and a row of Tall-nuts in front of them. Plant an Infi-nut in the rightmost column. Let's Rock! Boost the Infi-nut right after you start. This will take care of Imp Cannons, at least until they release their shower of Imps. Swashbucklers and Imps will have to eat through the Infi-nut force field before they can get to the Tall-nuts. Boost the Infi-nut again when the force field starts to look weak.
Fire Away![]
- Created by Snuffygetlucky
- Required plants:
Put a row of Coconut Cannons in the first column and a row of Lightning Reed in the second column. Put an Infi-nut in column five, row three. Let's Rock! Boost the Infi-nut immediately. This will deflect Imps not released by the Imp Cannon self-destruct. Boost the Infi-nut when the force field disappears. Use Coconut Cannons for the Imp Cannons, although this requires timing with the constant Raiding Parties and Imp Cannon firing. This should reduce the amount of Imp Cannons self-destructing greatly. Also use the coconuts when zombies get too close for comfort.
Zombie Popcorn[]
- Created by Bolt-Weed
- Place five Wall-nuts in column one.
- Place Spikeweeds everywhere else.
- Everything will simply die. Boosted or not, you will win.
Hot Potatoes (Contains gemium content)[]
- Created by Gmanpizza
- Place Snapdragons in all of the spaces in column one and two.
- In the third column, place Snapdragons in rows one, three, and five.
- Place Sweet Potatoes in rows two and four in the third column.
- No Plant Food needed.
Cannons Away![]
- Created by Mathdude314
- Place Coconut Cannons on the back row. Then, place Infi-nuts in front. You can place one or two rows as you wish. Save extra sun for repairs.
- If you do not have the Infi-nut, use Tall-nuts. You will have 125 sun left which you can use to repair one Tall-nut.
The Bodyguards (Contains gemium content)[]
- Created by BlueEyesRobotDragon
- Required plants:
- Plant five Bonk Choys on column one. Place two Sweet Potatoes on column two, rows two and four, and a Snapdragon in row three, in between the Sweet Potatoes. Place complete columns of Spikeweeds on the fourth and fifth columns, and place two more Spikeweeds in front of the Sweet Potatoes. Let us rock, and see if the Scurvy Trio that appears in this level will even be able to hurt the Sweet Potatoes.
[]
- Created by BF10
- Required plants:
- Plant from what is in this area:
R R B B B W W W W
D P S B B W W W W
R R B B B W W W W
D P S B B W W W W
R R B B B W W W W
- S - Spikerock
- R - Rotobaga
- P - Sweet Potato
- D - Dandelion
- W - Water
- B - Blank Space
- Now let the plants drop a train on the zombies - your Sweet Potatoes should not degrade and the Spikerock and Rotobagas should rock them. No Plant Food needed, but it can make the process faster.
By Pryp'yatMineralGamer[]
- Required plants:
- Spikeweed
- Fill the whole lawn with Spikeweed.
- Or plant A.K.E.E.s in back column, then Red Stinger and Chard Guard.
- Use Plant Food on the Chard Guards without leaves.
Beet It[]
- Simply plant Phat Beets on the following below:
P P P B B W W W W
P P P P B W W W W
P P P P B W W W W
P P P P B W W W W
P P P B B W W W W
- P - Phat Beet
- W - Water
- B - Blank Space
- This strategy does not require Plant Food. It will also earn you the Beet It achievement.
Bean Dragons[]
- Created by BLACK OUT
- Required plants:
- Plant Laser Beans on the first two columns on the left. Fill the third with Snapdragons. This strategy requires no Plant Food whatsoever.
[]
- Created by EpicGamer23468
Note: This strategy requires no Plant Food at all.
Note 2: This plant in this strategy was only available for a limited time, and cannot be obtained any more.
- Required plants:
- Place Jack O' Lanterns in the second column and burn off the zombies. If it helps, place Jack O' Lanterns in the first column as well.
Simple Wind Shield[]
- Created by GamesterD
- Required plants:
- Simply put an Infi-nut in the rightmost column and use Plant Food on it. Put Spikeweed in the last two columns in case the Imp Cannon's explosion breaches the lawn. Use Blovers on the Swashbuckler Zombies only. Do this right, you can enjoy zombies getting tortured.
Money Saver[]
- Created by yuanyc06
- Required plants:
- Plant two Phat Beets on the second and fourth row of the second column, and then two Spikeweeds on the second and fourth row of the third column. Then let's rock and have a cup of tea. This is the cheapest way to complete this level as far as I know (only 500 sun required, no Plant Food and lawn mower needed).
Laser Pea Nuts[]
- Created by Pinkgirl234
- Required plants:
Here are the following steps in performing the "Laser Pea Nuts" strategy:
- Plant Peashooters in the first column.
- Plant Repeaters in the second column.
- Plant Laser Beans in the third column.
- Plant Wall-nuts in the fifth column.
- After doing the first four starts, hit the "Let's Rock" button and watch the effects unfold.
SIDE NOTE: Save the Plant Food that you collected by particularly using them on Laser Beans when zombies start coming packed in large numbers.
Chard Guards and Aloes[]
- Created by Alessandro Mete
- Required plants:
- Plant Chard Guards and Aloes on the following below:
| B | A | C | B | B | W | W | W | W |
|---|---|---|---|---|---|---|---|---|
| B | A | C | B | B | W | W | W | W |
| B | A | C | B | B | W | W | W | W |
| B | A | C | B | B | W | W | W | W |
| B | A | C | B | B | W | W | W | W |
C: Chard Guard
A: Aloe
W: Water
B: Blank Space
It's Defending Time[]
- Created by Tung.jiaxing.5
- Required plants:
- Place Dusk Lobbers on the first three column. Fill up the rest of the space with Wall-nuts. Then "Let Us Rock." Note that this method can be done without using Plant Food!
The Emergency Squad[]
- Created by Tung.jiaxing.5
- Required plants:
- Place Dusk Lobbers on the first two column, Aloes on the third column, Tall-nuts on the 4th column and finally Primal Potato Mine. When there are too many Imps to handle, quickly use Plant Food on Tall-nut.
The SuperBoomBat Team[]
- Created by Tung.jiaxing.5
- Required plants:
- Fill the first column with Laser Beans. Spend the remaining sun on Bloomerang, then "Let Us Rock." Note that this method can be done without using Plant Food!
The Main Dish for plants today[]
- Created by Tung.jiaxing.5
- Required plants:
- Snapdragon
- Wall-nut
- Spikeweed
- Plant the Snapdragon, Wall-nut and Spikeweed on the following below:
S S W SW SW
S S W SW SW
S S W SW SW
S S W SW SW
S S W SW SW
S-Snapdragon
W-Wall-nut
SW-Spikeweed
[]
- Created by AngryBirds'sSuperFan
- Required plants:
Plant on the following below:
Note: The Spring Bean MAYBE useless.
| D | D | S | ~ | ~ | ~ | ~ | ~ | ||
| D | S | ~ | ~ | ~ | ~ | ~ | |||
| D | D | S | ~ | ~ | ~ | ~ | ~ | ||
| D | S | ~ | ~ | ~ | ~ | ~ | |||
| D | D | S | ~ | ~ | ~ | ~ | ~ |
- D=Dandelion
- S=Spring Bean
- ~=Water
[]
- Created by AngryBirds'sSuperFan
- Required plants:
- Plant Explode-O-Nut everywhere. Then "Let's Rock." After the first column disappear, repair it. 'Cause the explosions, the zombies will die early. No Plant Food needed!
[]
- Required plants:
- Cactus (better if boosted)
- Just plant three columns of Cactus and done. The Cacti's thorn can easily wreak havoc the Imp Cannons! If a Cannon manages to explode, the Cacti will hide and continues to damage like a Spikeweed, so they will be get rid quickly.
Note: if you don't have Cactus, you can use Laser Bean, however it should be upgraded into level 3 to reduce its cost to 175, equal to Cactus
Australian Strategy[]
Plants needed:
- Bloomerang
- Fill in the other slots
Instructions: Plant Bloomerangs on the three first column. This will make the Imp Cannons die very fast.
It should look like this:
BR BR BR - - w w w w
BR BR BR - - w w w w
BR BR BR - - w w w w
BR BR BR - - w w w w
BR BR BR - - w w w w
BR = Bloomerang
- = empty
w = water
[]
Pick up these plants:
Instructions: Plant Pea Pods at the first column, gain two more heads for every Pea Pods (They must have 3 heads per pod) and then, plant Torchwoods at the second columns, and you're ready!
It'll look like this:
P3 T - - - w w w w
P3 T - - - w w w w
P3 T - - - w w w w
P3 T - - - w w w w
P3 T - - - w w w w
Symbols: P3= Pea Pod with 3 heads
T= Torchwoods
-= Empty lands
w= Empty waters
Tips: During the final wave, use Plant Food on the Pea Pod at the lane that has too many zombies. Then, pick up the money bag!
Ker-nut-dragon Strategy[]
Plants needed:
- Kernel-pult
- Snapdragon
- Wall-nut
- Fill in the other slots.
Instructions: Fill the two left columns with Kernel-pults, and the next column to the right with Snapdragons, and the next one with Wall-nuts. This leaves you with 50 sun to replace a Wall-nut. Use Plant Food on Kernel-pults when needed, but occasionally it's better to use it on Snapdragons.
Winter Nut Strategy[]
Plants needed:
- Winter Melon
- Wall-nut (optional)
Instructions: Place a lane of Winter Melons on the most back row. And then, place Wall-nuts in front of the Winter Melons, just in case. With this strategy, almost no plants are harmed, as they are slowed down by the melon. This is how it look it:
WM WN - - -
WM WN - - -
WM WN - - -
WM WN - - -
WM WN - - -
WM : Winter Melon
WN : Wall-nut
- : Empty space
Bloonk Reed Strategy[]
Plants needed:
Instructions: Place the Lightning Reeds on the first column, Bloomerangs on the second column, Bonk Choys on the third column, and Wall-nut on the fourth. Use Plant Food if in an emergency.
Spikeweeds in all spaces[]
Plant needed:
Fill all spaces with Spikeweeds. Swashbuckler Zombies and Imp Pirate Zombies are both killed by two or three Spikeweeds. There are extra Spikeweeds because the Imps might land further when Imp Cannons explode.
S S S S S x x x x
S S S S S x x x x
S S S S S x x x x
S S S S S x x x x
S S S S S x x x x
S - Spikeweed
x - blank space/water
Spikerocks[]
Plant needed:
- Spikerock
Any other plants should be picked as filler plants.
This strategy is similar to the previous strategy, but with Spikerocks. They must be planted in the two leftmost columns, or else the Imp Pirate Zombies may get through.
SR SR O x x x x x x
SR SR O x x x x x x
SR SR O x x x x x x
SR SR O x x x x x x
SR SR O x x x x x x
SR - Spikerock
O - may be covered in Spikerocks where preferred.
x - blank space or water
Bloompeater[]
Plants needed:
Plant one column of Repeaters and two columns of Bloomerangs.
R B B - - x x x x
R B B - - x x x x
R B B - - x x x x
R B B - - x x x x
R B B - - x x x x
R - Repeater
B - Bloomerang
- = blank space
x - water
Cannons Away![]
Use Coconut Cannons wisely to beat the level. Plants needed:
Setup below:
K - C - W
K - C - W
K - C - W
K - C - W
K - C - W
Legend:
K: Kernel-pult
C: Coconut Cannon
W: Wall-nut
Spike Cannon Strategy[]
Plants that you need:
- Coconut Cannon
- Spikeweed
- Anything to take up residence in the other slots you have
Setup is as follows:
CC | SW | SW | SW | - | w | w | w | w
- | SW | SW | SW | - | w | w | w | w
CC | SW | SW | SW | - | w | w | w | w
- | SW | SW | SW | - | w | w | w | w
CC | SW | SW | SW | - | w | w | w | w
Legend:
CC = Coconut Cannon
SW = Spikeweed
- = Absolutely nothing
w = Water Coconut Cannons should only be used on Imp Cannons. The Swashbuckler Zombies and Imp Pirate Zombies will be automatically killed by the Spikeweeds.
Firewall/Trojan Horse strategy[]
Plants needed:
-Spikerock or Spikeweed (Spikerock recommended)
(You can choose any other plants, but they will be useless anyway)
Setup:
--STR—STR
-LSTR—STR—STR
S=Snapdragon
T=Tall-nut
R=Spikerock
L=Lighting Reed
- =blank
Strategy:
Tall-nuts block flying Imp Pirate Zombies and protect your Snapdragons from being damaged, and Spikerocks kill zombies before they damage Tall-nuts. At the last wave, when a lot of Imps come, use Plant Food on your Lighting Reed. Don't spend your plant food on Snapdragon or Spikerock, as they won't do a lot of damage, and don't spend it to Tall-nuts, either, because that will be completely useless (they will be slightly damaged or even not damaged at all at the end of the level, because of the Spikerocks and the firewall).
Have fun!
(This strategy was created by CoffeeCupProductions)
A Rainy Day strategy[]
Pick up these plants:
- Winter Melon
- Lightning Reed
- Threepeater (optional)
- Fill-ins
Plant a whole column of Winter Melons at the leftmost side. Then, plant Lightning Reed at the second column in the 2nd and the 4th square. It will looks like this:
WM - - - - w w w w | WM L - - - w w w w | WM - - - - w w w w | WM L - - - w w w w | WM - - - - w w w w |
Symbols: WM = Winter Melon
L = Lightning Reed
- = Open land
w = Open water
If you pick Threepeater on your side, build your defense like this:
WM L - - - w w w w |
TP L - - - w w w w |
WM L - - - w w w w |
TP L - - - w w w w |
WM L - - - w w w w |
Or:
TP - - - - w w w w |
WM TP L - - w w w w |
TP - - - - w w w w |
WM TP L - - w w w w |
TP - - - - w w w w |
However, it is not recommended to use the third setup because it will make lanes one and five very weak.
Symbols:
WM = Winter Melon
TP = Threepeater
L = Lightning Reed
- = Open land
w = Open water
Tricks for all setups: When the final wave arrives, use Plant Food on two Winter Melons to kill all the Zombies and Cannons.
Don't play with fire...and nuts Strategy[]
Plants needed:
- Snapdragon
- Tall-nut
- Instant kills(optional)
Setup:
SS
SSSST
SSS
SSSST
SS
S=Snapdragon T=Tall-nut
Use Plant Food on Tall-nuts if they move into their second degrade,unless they were already given Plant Food. Don't spend Plant Food on Snapdragon. TIP:Play level in Turbo Mode.
(This strategy was made by CoffeeCupProductions)
Spikedragon-nut Strategy[]
Sn Sn T Sp N W W W W X 5 row
Sn= Snapdragon, T= Tall-Nut, N= Nothing, W= Water.
You don't need to do anything, so I suggest to use turbo button. (There should be 125 sun left, but that's no use.)
The future is now strategy[]
By: Iamarepeater
Plants needed:
Spikeweed (Only if you took wall-nut)
Potato Mine and Chilli Bean (If you took Infi-nut instead)
How to unleash the strategy
Plant them in this manner:
Using infi-nut
| LB | LB | IF | CB | PM | ||||
| LB | LB | IF | CB | PM | ||||
| LB | LB | IF | CB | PM | ||||
| LB | LB | IF | CB | PM | ||||
| LB | LB | IF | CB | PM |
Using Wall-nut
| LB | LB | WN | SP | |||||
| LB | LB | WN | SP | |||||
| LB | LB | WN | SP | |||||
| LB | LB | WN | SP | |||||
| LB | LB | WN | SP |
Legend: LB = Laser Bean, IF= Infi-nut, CB= Chill Bean, PM= Potato Mine, WN= Wall-nut, SP= Spikeweed.
Keep Cool Strategy[]
By: BrainBucks
Plants needed:
Plant them in this way:
WM -----------------
WM -----------------
WM ----------------
WM ----------------
WM -----------------
Legend: WM = Winter Melon - = Open space or water
Plant Winter Melon near the lawn mowers then press "Lets Rock"
Plant food Wintermelons when final wave appears (Use them all)
Operation: Regeneration[]
By: BrainBucks
Plants Needed:
- Infi-Nut
- Spikeweed
Plant them in this way:
SW SW IF IF IF (5x)
Legend: SW= Spikeweed IF= Infi-Nut
Plant Spikeweed near to the lawn mower and fill the remaining spaces with Infi-nut.
Plant food a Spikeweed when a zombie comes close to a lawn mower (zombie with its arms present).
Infi-Bean[]
Plants needed : Infi-nut, Bonk-Choy, Snapdragon, Laser Bean and Kernel-Pult. Do the following setup :
L K B L K S
L K B I
L K S
L K B
L=Laser Bean K=Kernel-Pult B=Bonk-Choy S=Snapdragon I=Infi-nut Always plants the Infi-Nut directly behind the water. Use plant food on the Infi-Nut. The forcefield will block the imps and slow down the other zombies. If the forcefield is destroyed, re-use plant food.
Kernel-Ranga[]
Plants Needed:
- Kernel-pult
- Bloomerang
 |
|
|
 |
|
|
| |
|
|
| |
|
|
| |
|
|
Strategy by Rfm767, typed by Itsleo20.
Semi-Future[]
Plants needed : 1. Coconut Cannon 2. Tile Turnip 3. Infini-Nut
Steps:
1.plant in scenario below
cc IN
(cc) IN
cc IN
(cc) IN
cc IN
Legend: cc: coconut cannon
():tile turnip
IN: Infini-nut
2.use PF in Raiding Party And final wave (NOTE: USE PF IN TILED COCONUT CANNON)
This strategy is made by User:Jalapeno.jr
Let's Bowl![]
Plants needed: Bowling Bulb.
Fill the first 2 columns with bowling bulbs, then on the 3rd column plant 3 bowling bulbs on the 1st, 3rd, and 5th rows. Let the game play and use up the 2 plant foods given at the end of the level.
Bowling Bulb: BB
BB BB BB
BB BB
BB BB BB
BB BB
BB BB BB
This strategy was made by Asiaworld.
Wild West[]
Level I (Day 6)[]
Butter-butter-gutter-gutter[]
Plants needed:
Sp=Spikerock
-=empty space
Board[]
K------Sp
K------Sp
K------Sp
K------SpSp
K------Sp
K------Sp
Tips[]
Use Plant Food or Power Ups in danger.
[]
Plants needed:
Max out a Pea Pod in the left-most mine cart. Plant a Torchwood on the mine cart next to it. Plant Tall-nuts in every space in the fourth column. After starting the onslaught, give Plant Food to the Torchwood. Now, move the Pea Pod and Torchwood wherever there are high priority zombies, and give Plant Food to the Pea Pod when things get tough. And that's about it!
No Witty Name Strategy[]
Plants needed:
- Pea Pod
- Winter Melon
- Anything to use the remaining 375 sun with(possibly a Threepeater)
- Filler
Put the Winter Melon in the minecart all the way in the back. Put a full Pea Pod in the middle minecart, and whatever you choose as the third plant(suggested to be a Threepeater) in the third minecart. The Pea Pod and Winter Melon should be slided around to take charge of the tougher zombies, while the third plant is there just for filling purpose. There are too many Pianist Zombies to use either Spikeweed or Spikerock effectively enough, so don't use them. During the final wave, and once before it if the situation gets rough, feed Plant Food to the Winter Melon to deal massive damage to everything. The Pea Pod can deal with all the zombie types in this level(albeit perhaps needing some help with protected Poncho Zombies) as can the Winter Melon; though zombies will get less forward if hit with the Winter Melon, so it is recommended to use the Winter Melon to defeat higher priority zombies like Poncho Zombies with metal plates.
Armored Squadron[]
Plants needed:
Put the Winter Melon on the cart at the back, and Repeaters on the second and third carts. You should have at least 750 Sun left. After the rails end place a row of Peashooters followed by a row of Wall-nuts. Since you only have 2 Plant food in this level, they must be used correctly. Slide the Winter Melon around to ensure that all of the zombies get slowed down so they can be dealt with easier. Use Plant Food on heavily damaged Wall-nuts or if a Pianist Zombie is about to get close to one. If you don't use the Plant Food and get through, use them on the Winter Melon.
Winter Coconut[]
Plants needed:
Plant Coconut Cannon on the first mine cart and Winter Melons on the two other mine carts. Move one of the Winter Melons to the 2nd lane and the other to the 4th lane. Move them to other lanes when needed. Give Plant Food to Winter Melon when there are a lot of zombies.
Potato mine's Gold mine Strategy[]
Take the following plants:
-Bonk Choy (optional)
Do the following setup:
p* [ [ PWs
[ [ [ SWs
[ * [ PWs
[ [ [ SWs
[ [ p* SWW
p=potato mine
- =mine cart or plant on a mine cart
[ =mine rail
P=Peashooter
W=Wall-nut
s=Spikerock
S=Snapdragon
(This strategy was made by CoffeeCupProductions)
Coconuts Rails Strategy[]
Place coconuts canons on the minecarts, then plant a column of Kernel-Pults and a column of Wall-Nuts. Move and fire the cannons when needed. Placement :
C R R K W
R C R K W
R R R K W
R R R K W
R R C K W
R=Rail C=Coconut Cannon K=Kernel-Pult W=Wall-Nut
Rotten coconuts strategy[]
NOTE:Now that in 2.1. version Pianist Zombies no longer die from Chilli Beans,the strategy no longer works. However,if you have an unupdated version,it works perfectly. Take the following plants:
Do the following setup:
_ _ _ BBBBB
C _ _ BBBBB
_ _ _ BBBBB
_ _ C BBBBB
_ _ _ BBBB
_=Rail
C=Coconut Cannon
B=Chilli Bean
Older version (requires Potato Mine):
_ _ _ _BBBBB
_ _ _ CPBBBB
_ _ _ _BBBBB
_ _ _ CPBBBB
_ _ _ _BBBBB
_= Blank space or Rail
C=Coconut Cannon
P=Potato Mine
B=Chilli Bean
Strategy:
At first,use Plant Food on Chilli Bean to fill in the non-rail blanks. Time perfectly,use Plant Food on Coconuts before Final Wave only if you are in big trouble (This may not happen.)
(This strategy was made by CoffeeCupProductions)
====Just the Cannons====
Note: It's simple, but deadly.
Take this plant:
Anything else to fill the seeds.
{CC} -- -- ^^
-- -- -- {CC}
-- {CC} -- ^^
-- -- -- {CC}
-- -- {CC} ^^
Keywords:
CC - Coconut Cannon
{} - cart
-- - track
^^ - empty space
(This strategy was made by Cooler39140)
Winter Time in the west Strategy[]
Plants:
| WM | WM | ||||||||
| WM | |||||||||
(Strategy by: Realangrybirdplush)
Wall of Bloom[]
- Plants needed:
- Bloomerang
- Wall-nut
- Chili Bean
- Filler plants
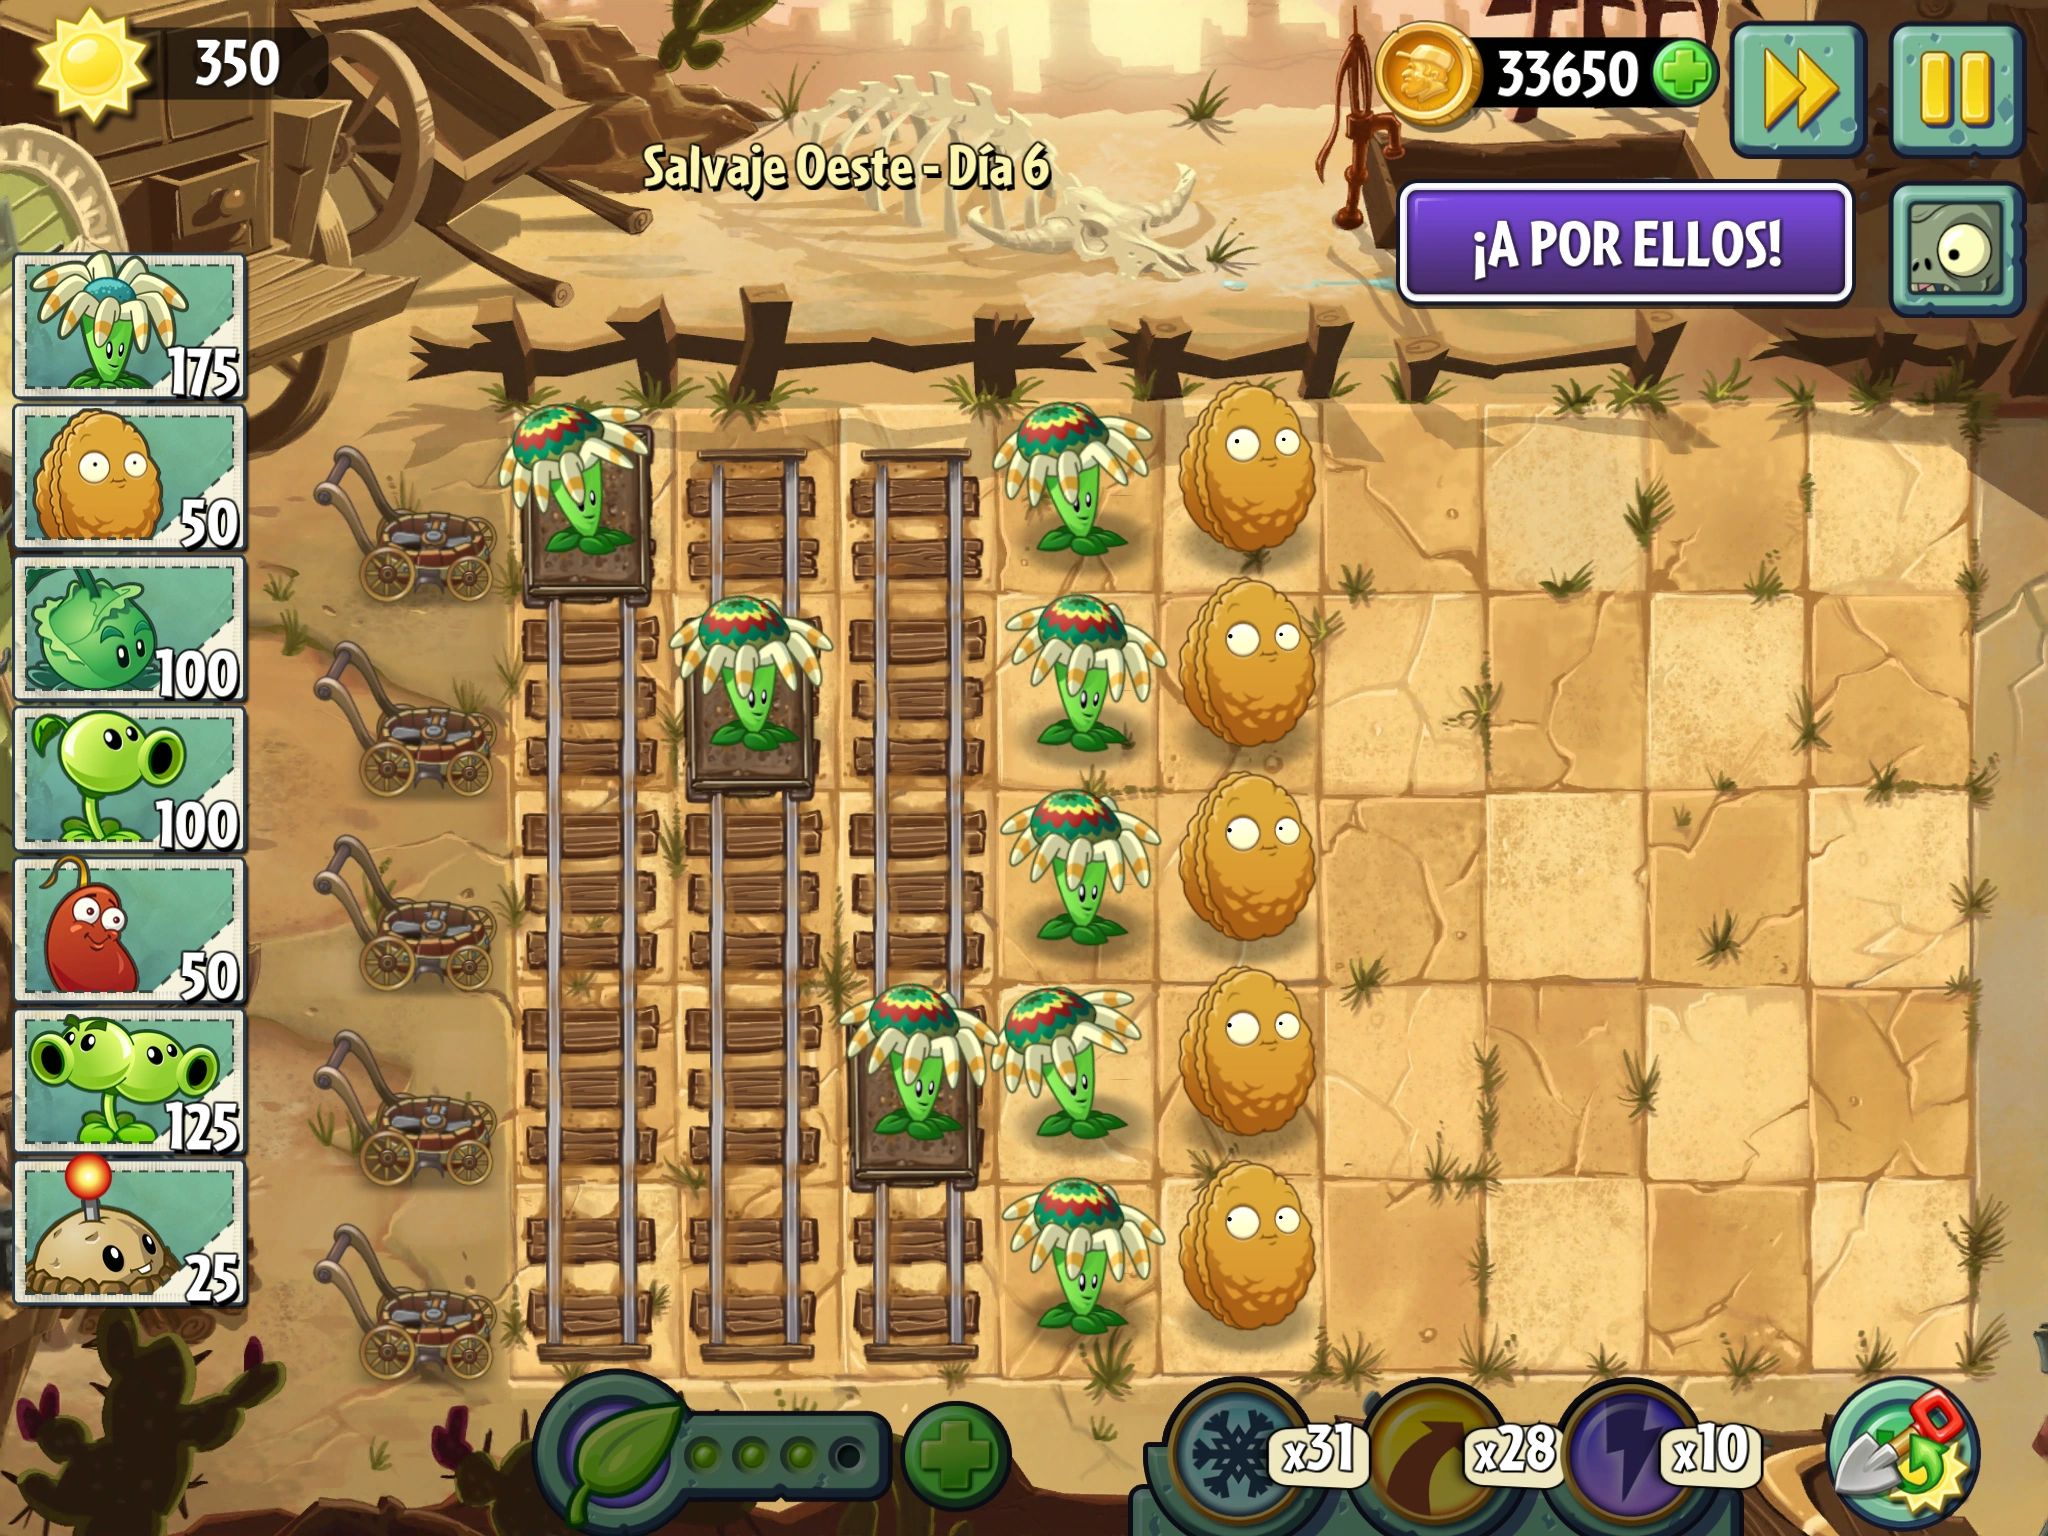
(The above picture shows the strategy set)
This strategy is not particularly efficient, but it is meant to beat Wild West-Day 6 is Wild West was entered before Pirate Seas. It relies on the above placements; obviously moving the mobile Bloomerangs to add damage in certain rows. It also relies on using Chili Beans to take care of strong zombies. It is recommended to use the Plant Food on the Chili Beans rather than the Bloomerangs. The strategy can win the level, but it is hard to win without losing lawn mowers; although not impossible.
(Note: This strategy has only been tested in 2.0.1. However, it can beat the level without losing lawn mowers(barely) so it may be possible in 1.7. It also may be possible to beat it in 1.6 due to the lesser density of zombies. However, it has not been tested on those.)
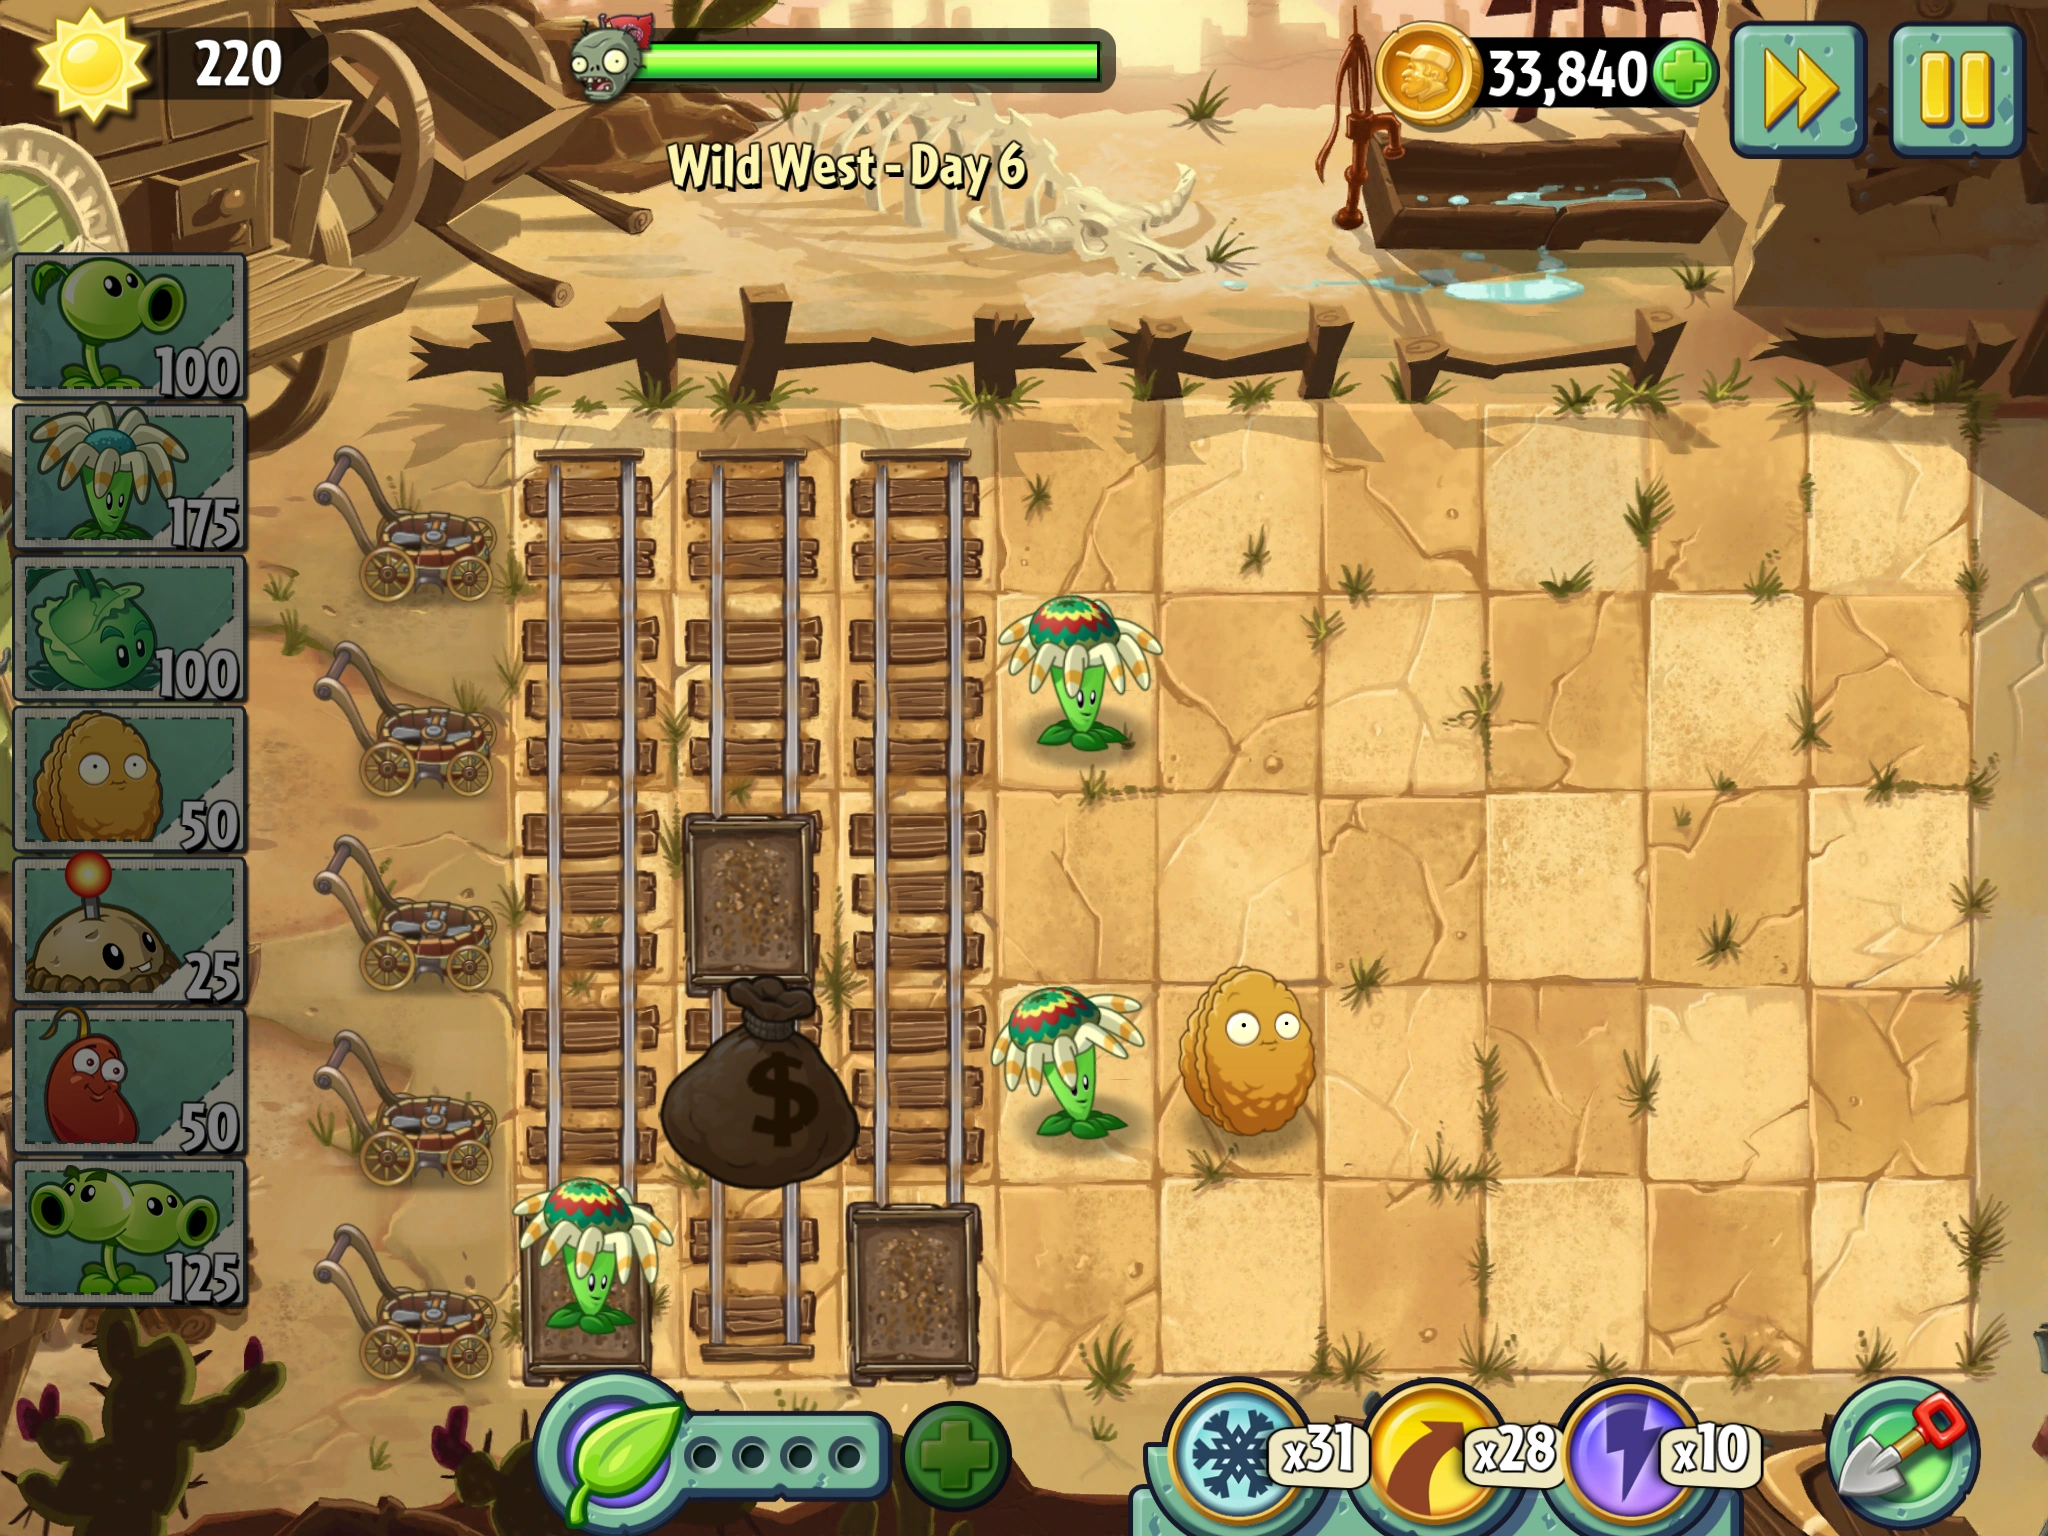
(The above picture shows victory was obtained without losing lawn mowers)
Level II (Day 18)[]
[]
Plants:
- Starfruit
- Filler
Plant Starfruit on the leftmost tiles. DO NOT plant on minecart.
Arrangement:
⭐️ - ⭐️ - - - - - -
⭐️ - ⭐️ - - - - - -
⭐️ - - ⭐️ - - - - -
- ⭐️ - ⭐️ - - - - -
- ⭐️ - Pl - - - - -
Symbols:
⭐️ = Starfruit Pl = Starfruit. Use PF on that Starfruit at the Final Wave when a zombie start to bite it.
Tips:
This strategy needs no Plant Food at all, but you may lose one to two Starfruit at the final wave. If you want, use a Plant Food on the Starfruit on the 4th column at the bottom.
Spike and Mine Strategy[]
Plants needed
Plant Spikeweeds at the 2 front rows. Add a row of Wall-nut behind. Plant 2 rows of Potato Mines behind the Wall-nuts. No Plant Food is needed.
- - - - P P W S S
P: Potato Mine
W: Wall-nut
S: Spikeweed
-: Empty space
Spikenut Strategy
plants needed:
2 Front line put spikeweeds and 2 rows of wallnut behind them.Use plant food wisely.
Spikyshooter strategy[]
Plants needed[]
Instructions[]
First, place Spikeweeds at the very front twice, then, put the Peashooters where Prospector Zombies most likely come, then you finished
Board[]
P - - - - - - S S
P - - - - - - S S
P - - - - - - S S
- P - - - - - S S
- P - - - - - S S
Keys[]
- P-Peashooter
- S-Spikeweed
- --Blank space
Tips[]
Don't worry, Prospector Zombies will die on the Spikeweed.
Buttered Spikes[]
Plants needed:
K - - - - - - S S
K - - - - - - S S
K - - - - - - S S
- K - - - - - S S
- K - - - - - S S
Wall-nut/Spikerock strategy[]


Plants needed:
Place 5 spikerocks on the rightmost column and 5 Wall-nuts on the 8th column (like in the picture). This should stand until the end of the level. But always check Wall-nut health: if you see that some of wall-nuts is about to be eaten, use plant food on them.
If Spikerocks are unavailable, Spikeweed will also work to a lesser extent. Ensure that you have the spade refund incase a Prospector Zombie or the occasional Zombie Chicken doesn't get killed.
Too Much Lightning[]
Plants needed:
- Lightning Reed
- Wall-nut (Optional)
First, put Lightning Reeds on all 4 mine carts. Then put more Lightning Reeds to the 3 tiles in the back. Save 250 sun and put the Wall-nuts close to the Lightning Reeds.
- L - Lightning Reed
- W - Wall-nut
- X - Trails
- (?) - Mine cart with plant
- E - Empty space
L / (L) / E / (L) / W
L / X / E / X / W
L / X / (L) / E / W
(L) / L / X / L / W
X / L / X / E / W
NOTE: Sometimes Prospector Zombies launches when not defeated in time, so use Plant Food wisely and not always. And sometimes they eat your Lightning Reeds.
No lightinging reed/Split pea stragety.One lane of spikeweed at the MOST front,Wall-nut one step behind
And bonk choy behind the wallnut in one step
Winter Weeds[]
Plants:
- Winter Melon
- Spikeweed
Simply put a Winter Melon on each Minecart that spans three spaces and then fill the fifth column with Spikeweeds. Make sure to keep all zombies slowed and focus your attacks on Coneheads or Chicken Wranglers that get too close to the Spikeweeds. If your Winter Melons are getting overwhelmed, use Plant Food on one of them to wipe out most of the zombies. If a Prospector gets past without being slowed, then simply keep your Winter Melons out of its way until it has passed them and is approaching the Spikeweeds.
Punch it like it's nut! Strategy[]
Plants needed:
Setup:
_ _ _ _B W_ _ S (x5)
B=Bonk Choy W=Wall-nut S=Spikeweed
Use Plant Food on Bonk Choy if Lots of zombies come too close.
Have fun!
(This strategy was made by CoffeeCupProductions)
Sticky Strategy
Plants needed:
Setup:
_ _ _ _ K _ _ SS
K=Kernel-pult S=Spikeweed _=Blank
Use Plant Food when lots of Coneheads touch both Spikeweeds.
Do not Cross Stategy
Plants needed:
- Snapdragon
- Bonk Choy (optional)
- Spikeweed
- Wall nut
Setup: (Snapdragon)
- - - - - - SP WN SW (5x)
-Or-
Setup: (Bonk Choy)
- - - - - - BC WN SW (5x)
- = none SP = SnapDragon BC = Bonk Choy WN = Wall nut SW = Spikeweed
After following the setup, Press the Turbo Button (Up-Right) and the press "Let's Rock"
You will be finished in about 2-3 min. ... to speed up the game more quickly: Power Up Snapdragons or Bonk Choy when the word appears " Final Wave"
Have Fun!!!
(The "Do Not Cross" strategy was made by BrainBucks )
Peachoy Strategy
Take these plants
- Snow pea
Bonk Choy
- don't have Snow pea?No problem!Change it with Peashooter and wall nut!
With snow pea Do THIS
S_B_C
S_B_C
S__BC
_S_BC
_S_BC
Legend:S=Snow pea _=Rail\Minecart B=Blank C=Bonk choy P=Peashooter W=Wall nut
With Peashooter Do THIS
P_B_CW
P_B_CW
P__BCW
_P_BCW
_P_BCW
Tip:Make sure to stock up on Plant Food especially with the Snow Pea Strategy.
Do this and you'll "ace" the level:)Bold text
Spiky Balls Strategy[]
Plants needed:
Setup:
P [] _ [] _ _ _ _ S
P [] _ [] _ _ _ _ S
P [] [] _ _ _ _ _ S
[] P [] _ _ _ _ _ S
[] P [] _ _ _ _ _ S
P = Repeater or Laser Bean or Bowling Bulb, whichever one you chose
S = Spikeweed
[] = Minecart track
Use plant food when needed, but delay using it until the last wave if possible. It doesn't matter which one you chose, you will have zombies get very close before dying.
Level III (pre-1.7)[]
Pea-pult strategy[]
Plants needed:
First, make a Pea Pod four at the very back mine-cart, then, plant Melon-pults on the front of the tracks, then plant the Tall-nut and your ready!
Tips:Use Plant food wisely
Winter-nut[]
Plants needed:
- Winter Melon=W
- Tall-nut=T
- --=Blankspace
Setup:
- - W - - - - - -
- - W - - T - - -
- - W - - - - - -
- - W - - - T - -
- - W - - - - - -
Tips:Use Plant food on Tall-nuts to have strong defense. Also use Power Ups when there's a huge wave of zombies like Power Toss.
Spiky Tall Coconut[]
Plants needed:
Plant Coconut Cannons on the two mine carts, Tall-nuts in the 4th column, and Spikerocks in the 5th column. Move the Coconut Cannons when needed.
x x - Tn Sr - - - -
Cc x - Tn Sr - - - -
x x - Tn Sr - - - -
x Cc - Tn Sr - - - -
x x - Tn Sr - - - -
Cc - Coconut Cannon
Tn - Tall-nut
Sr - Spikerock
- = Blank space
x - Rail
Tall-nuts Bomb[]
Plants
Cherry Bomb (If you have it)
Back rails : Winter Melons
Front rails : Tall-nuts (2 are enough)
Last lane : Spikeweed (1 column enough)
In front of the back rails in the first column put 2 Winter Melons on the 2nd and 4th lanes. (Note : Move the rails wisely.). Use Cherry Bomb in any needs.
Far Future[]
Level I (Day 11)[]
Laser-Peach-Nut Strategy[]
Plants needed:
Make two columns of Laser Beans, then two columns of Wall-nuts. Use the E.M.Peach when needed.
Simple Strategy[]
Just put a Winter Melon on every Power Tile except the right red one.
Fiery Oranges Strategy[]
Plants needed:
C E S W E E E E E
C E S W E E E E E
C E S W E E E E E
C E S W E E E E E
C E S W E E E E E
C=Citron
E=Empty Space
S=Snapdragon
W=Wall-nut
Organize your defenses in this way. This strategy is actually fully automatic and no plant will get eaten, no Plant Food will need to be used and no Lawn Mowers will be lost. At times, it may look like Wall-nuts are going to get eaten, but don't worry, it doesn't happen. If you are worried though, you can always give Plant Food to one of the Snapdragons.
Laser Dragon Strategy[]
Plants needed:
Plant two columns of Laser Beans, then one column of Snapdragons. Use Plant Food on Power Tiled plants when necessary.
Beans and Nuts[]
Plants needed:
Plant two columns of Laser Beans and one column of Tall-nuts.
Great Wall of Melons[]
Plants needed:
- Melon-pult
- Winter Melon
- E.M.Peach
- Wall-nut
Plant 3 melon-pults and 2 winter melons. Plant them with the most efficient power tile arrangement possible. Try to save at least 2 EMPeaches for the last wave, as there are several robo-cones.
Buttered and roasted[]
Plants needed:
K L L W E E E E E
L L K W E E E E E
L K L W E E E E E
K L L W E E E E E
L L K W E E E E E
L=Laser Bean
K=Kernel-pult
W=Wall-nut
E=Empty Space
Organize your defenses in this way. Use Plant Food on Power Tiled Plants at Final Wave.
[]
Plants needed:
- Laser Bean
- Snow Pea (premium)
Plant as shown:
SP (LB) LB E E E E E E
(LB) SP LB E E E E E E
[LB] SP [LB] E E E E E E
SP LB {LB} E E E E E E
SP {LB} LB E E E E E E
SP = Snow Pea
LB = Laser Bean
() = Green Power Tile
[] = Red Power Tile
{} = Yellow Power Tile
E = Empty
Use Plant Food on the Power Tiled Laser Beans when necessary.
Fridgerated Butter[]
Plants needed:
- Winter Melon
- Kernel-pult
- Any other plant not needed
Place a lane full of Winter Melons on the first lane. After that plant two Kernel-pults in the square in front of the X Tile with the Winter Melon and the square at the back of the Triangle Tile. Like this:
WM X - - - - - - -
WX K - - - - - -
WS - S - - - - - -
WM K T - - - - - -
WM T - - - - - - -
Guide:
WM = Winter Melon.
K = Kernel-pult.
X: X Tile.
S: Square Tile.
T: Triangle Tile.
WS: Winter Melon on Square.
WX: Winter Melon on X.
Hurlin' Snappy[]
Required Plants:
- Chard Guard
- Aloe
- Snapdragon
- Any instant (optional, not really needed.)
This strategy relies on Chard Guards as main offensive and defensive plants. Aloes will heal them and replenish their leaves, while Snapdragons kill Jetpack Zombies.
leave the first and second column blank. plant your Snapdragons on third column, Aloes on the fourth, and Chard Guards on fifth column.
Here's the diagram:
O O S A C
O O S A C
O O S A C
O O S A C
O O S A C
O = Blank
S= Snapdragon
A= Aloe
C= Chard Guard
The main reason the first two column is left blank is to make the Jetpack Zombies can't stop your turbo mode, and also make zombies easier to reach your Chard Guards, Thus making your game finish earlier. if you want to be even faster, feel free to plant your Chard Guards and Aloes few more tiles to the right. however, this can make your Chard Guards and Aloes overwhelmed by swarm of Zombies. Replace your Chard Guard quickly with your remaining sun if this happened (however, it's not likely to happens, unless you set your defense too far from your house.
Level II (Day 22)[]
Laser-Peach-Nut Strategy[]
Plants needed:
- Laser Bean
- Either E.M Peach or Wall-nut
Plant two Laser Beans in each row and feed them Plant Food wisely. If you chose the E.M Peach, use them wisely, as you can only plant ten of them. If you chose the Wall-nut, plant one of them in front of the Laser Beans. There is no need to feed the Wall-nuts Plant Food.
Slender-Zombie Strategy[]
Plants needed:
Extras needed:
- Lawn Mower Boost
Plant plants so they look like this:

|
|||||
|---|---|---|---|---|---|
|
|

|
||||

|

|

|
|||
|
|
|
||||
|
|

When the Gargantuar Prime arrives, activate the lawn mower.
When the four Bucketheads at the bottommost rows arrive, feed the Threepeater Plant Food. Otherwise, use it when zombies are near one of your plants. Wall-nuts can fit there.
Laser Bean and Infi-nut Combo[]
Plants:
Step 1: Plant the Laser Beans on the power tiles, (Just like the patteren.
Step 2: Plant 2 Infi-nuts infront of the laser beans on lanes 2 and 4.
Step 3: Lets rock!
Note: Don't change the Layout!
Lawn:
LB LB
() () LB LB IN
LB LB
() () LB LB IN
LB LB
Key:
LB= Laser Bean
IN= Infi-nut
()= Empty Space
(strategy by: Realangrybirdplush)
Laser Madness[]
Plants needed:
Setup:
The setup would be two columns of Laser Beans.
Application:
Use Plant Food wisely, as you only rely on 2 columns of Laser Beans. You can use this for a challenge for yourself. You can also put more additional Laser Beans
(Note: The creator of this strategy used this to pass the level for the first time, and he passed successfully the level)
Dark Ages[]
Night 6[]
Baloon-nut Strategy[]
Plants needed:
Setup: Plant Fume shrooms first two lanes. In third lane plant tall-nuts.(Plant tall nuts when tombstones are broken.) Use the plant food when necessary.
Who did: This strategy made by--Pvz2: DARK AGES
Burninating the Peasants[]
Plants needed:
Plant as shown:
SD SD WN E E E E E E
SD (SD) WN E E E E E E
SD SD WN E E E E E E
SD (SD) WN E E E E E E
SD SD WN E E E E E E
SD = Snapdragon
(SD) = Snapdragon and Tile Turnip
WN = Wall-nut
E = Empty space
Use plant food on the power tiled Snapdragons when the bucketheads start eating the Wall-nuts. There may be some gravestones preventing you from planting the Wall-nuts as shown, so wait for the Snapdragons to destroy them, then plant the nuts.
Laser Fumes[]
Made by Brainulator9
Plants needed:
Plant as shown:

|

|
|
||||||
|
|
|
|
||||||
|
|
|
|
||||||
|
|
|
|
||||||
|
|
|
|
Place Wall-nuts where tombstones where destroyed, if necessary. For the huge wave, use Plant Food on all but one Laser Bean, and replace Wall-nuts when necessary (use any Shovel upgrades you have on Wall-nuts, if possible.)
Flaming Fumes Strategy[]
Created by: SpongeBob IdiotPants
Plants needed:
Plants as shown:
FM SN WN
FM (SN) WN
FM SN WN
FM (SN) WN
FM SN WN
FM = Fume-shroom
SN = Snapdragon
(SN) = Snapdragon on Tile Turnip
WN = Wall-nut
Plant Fume-shrooms in the first column. Plant the second column of Snapdragons then plant Tile Turnips on the Snapdragons on the second tile of the second row and fourth row. Replace the destroyed graves with Wall-nuts (if you have more sun left, repair the damaged Wall-nuts for later).
Night 15[]
Electric Cabbage Strategy[]
This is a good strategy for those who haven't completed the previous worlds.
Plants needed:
Plants as shown:
C P P I
C P P I
C P P I I
C P P I
C P P I
C = Cabbage-pult
P = Lightning Reed or Fume-shroom, depending on what you chose
I = Infi-nut
Use one Plant Food on an Infi-nut after the first wave of Jester Zombies and on Cabbage-pults to deal with Wizard Zombies when necessary. This strategy is not perfect, either way you will likely lose plants or even lawnmowers but you should be okay. There are probably variants that work better.
If you have already beaten this level, replace the Cabbage-pults with Magnet-shrooms. It will become much easier.
Have fun!!!
Big Wave Beach[]
Day 12[]
Winter Melon Bowling-nut Strategy[]
Plants Needed:
- Winter Melon
- Bowling Bulb
- Wall-nut
Formation
BB WN
WM
BB WN
WM
BB WN
WM- Winter Melon
BB- Bowling Bulb
WN- Wall-nut
Tip: Use Plant Food
This strategy is made by bonk choy lf
Frostbite Caves[]
Day 12[]
[]
Plants needed:
- Homing Thistle
- Pepper-pult
Plants Formation
H
H P
H H
H P
H
H- Homing Thistile
P - Pepper-pult
Infi-Peppers Strategy[]
Plants needed:
- Pepper-pult
- Infi-nut
- Peashooter (can replace with Cabbage-pult or Kernel-pult if you wish)
- Instants (Cherry Bomb is recommended)
Plants formation:
 |  |  |
| | |
| | |
| | |
| | |
In the final wave, if zombies are breaking through, shovel rows that have no more zombies, and use the sun from Shovel Boosts on instant kills.
Again, if you wish, replace the Peashooters with Cabbage-pults or Kernel-pults.
Snappy Rocks Strategy[]
Plants needed:
Twin Sunflower
Snap Dragon
Wall-nut or infi-nut.
Spikerock
SR TS SD SR WN SR
SR TS SD SR WN SR
SR TS SD SR WN SR
SR TS SD SR WN SR
SR TS SD SR WN SR
If you need to, just do snap dragons the front row.
| V · T · E |
| Recurring | Special Delivery · Locked and Loaded · Save Our Seeds · Last Stand † |
| World exclusive | Cannons Away · Not OK Corral · Sun Bombs · Dark Alchemy · Bulb Bowling* · Beghouled |
| China exclusive | Mummy Memory · Powder Keg · Bronze Matrix · All by Oneself · Zomboss Test Lab · Fright Theater · Tit for Tat · Oak Archery · Gluttonous Hungry Guacodile · Vasebreaker · Plant Maze · Dodo Adventure · It's Raining Seeds · One Gun Guard · Air Raid · Across the Lawn · Dark Stormy Night · Unsodded · Whack-a-Zombie · Statue-shuffling* · Ninjimp Adventures |
| †: Strategy page *: Unconfirmed name |